Battery switch on travel trailer function is crucial for managing your RV’s power. Understanding how your battery switch works – whether it’s a simple single-pole or a more complex double-pole double-throw – is key to preventing dead batteries and maximizing your off-grid adventures. This guide dives into the various types of switches, their functions, troubleshooting tips, and proper maintenance practices, ensuring you’re well-equipped to handle any power situation on the road.
We’ll cover everything from identifying the different switch types and their wiring diagrams to diagnosing common problems and performing basic maintenance. Learn how to prevent battery drain, extend battery life, and even safely install a new switch if needed. We’ll also explore how battery switch function changes based on different battery configurations (single vs. dual batteries) and their interaction with other RV electrical components like solar panels and converters.
Battery Switch Types in Travel Trailers
Choosing the right battery switch for your travel trailer is crucial for managing your power systems effectively and safely. Different switches offer varying levels of control and complexity, each with its own advantages and disadvantages. Understanding these differences will help you select the best option for your needs.
Single-Pole Battery Switches
Single-pole switches are the simplest type. They offer a single on/off function, connecting or disconnecting one battery to the trailer’s electrical system. This is suitable for trailers with a single battery. The wiring is straightforward: one wire from the battery, one wire to the trailer’s electrical system, and the switch placed in between. A visual representation would show a single line representing the battery connecting to the switch, and then another line from the switch to the trailer’s electrical panel.
The disadvantage is that you can’t isolate the battery from the trailer’s system independently of the charging system.
Double-Pole Battery Switches
Double-pole switches provide more control. They independently switch both positive and negative terminals of the battery, offering a complete disconnect. This enhances safety by completely isolating the battery from the trailer’s system when off. The wiring involves two separate lines, one for positive and one for negative, each routed through the switch. Imagine a diagram showing two lines (positive and negative) from the battery, each connecting to a separate pole of the switch, and then separate lines continuing from the switch to the trailer’s system.
The added safety is a significant advantage, but they still don’t allow for charging one battery while another is disconnected.
Double-Pole Double-Throw (DPDT) Battery Switches, Battery switch on travel trailer function
DPDT switches are the most sophisticated and offer the greatest flexibility. They allow you to switch between two batteries (e.g., a house battery and a starting battery) or connect both to the system simultaneously. This is particularly useful for larger trailers with multiple battery banks. A wiring diagram would illustrate the complexity, showing two batteries, each with positive and negative lines, all connected to the switch.
The switch’s throws allow for selection of either battery, both batteries, or neither. The increased complexity comes with a higher cost and slightly more challenging installation.
Comparison of Battery Switch Types
| Feature | Single-Pole | Double-Pole | Double-Pole Double-Throw (DPDT) |
|---|---|---|---|
| Number of Batteries Controlled | 1 | 1 | 2+ |
| Safety | Low | Medium | High |
| Flexibility | Low | Medium | High |
| Cost | Low | Medium | High |
| Installation Complexity | Low | Medium | High |
Function and Purpose of the Battery Switch
The battery switch in your travel trailer is a crucial component that manages the flow of power between your trailer’s house batteries and the vehicle’s starting battery. It’s a simple yet effective device that plays a vital role in protecting your investment and ensuring your trailer’s electrical system functions reliably. Proper use significantly impacts both the lifespan and performance of your batteries.The primary function of the battery switch is to isolate the house batteries (used to power appliances and lights inside the trailer) from the vehicle’s starting battery (used to crank the engine).
This isolation prevents the house batteries from draining the starting battery, and vice versa. This is particularly important when the trailer is disconnected from the tow vehicle for extended periods, such as during camping trips or storage.
Battery Protection
The battery switch acts as a safety mechanism, preventing accidental discharge of either battery system. For example, if a light is left on inside the trailer while it’s disconnected from the tow vehicle, the house battery will discharge independently without affecting the vehicle’s ability to start. Similarly, a faulty alternator or parasitic drain in the vehicle’s electrical system won’t drain the house batteries.
This independent control provides significant protection against unexpected battery failure and ensures that you’ll always have a reliable starting battery for your tow vehicle.
Prevention of Battery Drain
A common problem with travel trailers is unwanted battery drain due to low-level current draws from various devices or even faulty wiring. The battery switch allows you to completely disconnect the house batteries when the trailer is not in use, effectively eliminating any potential drain from these sources. This is essential for maintaining a full charge and preventing sulfation, a condition that significantly reduces battery life and performance.
Leaving the switch in the “off” position when not using the trailer ensures that your batteries remain charged and ready for your next adventure.
Extending Battery Life
By preventing unwanted discharges and providing a means to completely disconnect the house batteries, the battery switch significantly contributes to extending their lifespan. Deep discharges, even infrequent ones, are detrimental to battery health. The switch allows you to manage the charging and discharging cycles of the batteries more effectively, maximizing their overall service life. This translates into less frequent battery replacements and lower long-term costs.
Proper use of the battery switch is a simple yet highly effective method of extending the useful life of your valuable batteries.
Troubleshooting Common Battery Switch Issues: Battery Switch On Travel Trailer Function
Travel trailer battery switches, while seemingly simple, can cause significant headaches if they malfunction. Understanding common problems and how to diagnose them can save you time, frustration, and potentially a costly repair. This section will guide you through identifying and resolving issues with your battery switch.
Visual Inspection of the Battery Switch
Before resorting to electrical testing, a thorough visual inspection is crucial. Often, the problem is readily apparent. Look for signs of damage that might indicate a faulty switch or compromised connections.
Carefully examine the switch itself for any signs of physical damage such as cracks, burns, or excessive wear. Check all connecting wires for corrosion, loose connections, or signs of overheating (discoloration or melting of insulation). Pay close attention to the terminals – look for any green corrosion buildup, which is a common problem in damp environments. If you find corrosion, carefully clean the terminals with a wire brush and baking soda solution.
Ensure all connections are tight and secure. A loose connection can lead to intermittent power or complete failure.
Testing Battery Switch Functionality with a Multimeter
A multimeter is an invaluable tool for diagnosing electrical problems. It allows you to test the continuity and voltage across the switch to pinpoint the exact location of the fault.
First, disconnect the battery cables from the switch to ensure your safety. Then, set your multimeter to the continuity test mode (usually indicated by a diode symbol). Touch the multimeter probes to the input and output terminals of the switch in its “on” position. A continuous beep indicates a good connection. If you don’t hear a beep, the switch itself may be faulty.
Next, set your multimeter to measure DC voltage. Connect the red lead to the positive terminal of your battery and the black lead to the negative terminal. With the switch “on”, measure the voltage at the output terminals of the switch. If the voltage reading is significantly lower than the battery’s voltage, this indicates a problem with the switch or the wiring between the switch and the battery.
If the switch is “off”, the voltage reading should be close to zero. A voltage reading across the terminals when the switch is “off” suggests a short circuit.
So, you’re planning a trip? Awesome! Don’t forget travel insurance! Check out Aon travel insurance for comprehensive coverage. They’ve got options to fit every budget and trip type. Then, once you’ve compared a few options, you might want to also look at Aon travel insurance to see if their plans offer better value for your specific needs.
Getting insured is key for peace of mind – it’s a small price to pay for avoiding potential travel nightmares!
Troubleshooting Flowchart
A flowchart can streamline the diagnostic process. Follow these steps to effectively troubleshoot your battery switch problems:
Start by visually inspecting the battery switch and its connections. If you find corrosion or loose connections, clean and tighten them. Retest the system. If the problem persists, use a multimeter to test the switch’s continuity and voltage as described above. If the switch fails the multimeter test, it needs replacement.
If the multimeter test is successful, but the problem remains, there’s likely a problem elsewhere in the wiring or with the battery itself, requiring further investigation.
Here’s a simplified representation of a troubleshooting flowchart:
| Step | Action | Result | Next Step |
|---|---|---|---|
| 1 | Visual Inspection | Corrosion/Loose Connections | Clean/Tighten Connections; Retest |
| No Obvious Problems | Multimeter Test | ||
| 2 | Multimeter Test (Continuity & Voltage) | Switch Faulty | Replace Switch |
| Switch Functional | Investigate Wiring/Battery |
Proper Battery Switch Usage and Maintenance
Keeping your travel trailer’s battery switch in good working order is crucial for reliable power and preventing costly repairs. Proper usage and regular maintenance will extend the life of your switch and ensure your batteries are ready when you need them. Neglecting this vital component can lead to frustrating breakdowns and potentially damage to your electrical system.Proper operation and upkeep of your battery switch is straightforward but essential.
Understanding the correct procedures and performing routine checks will significantly contribute to the longevity and effectiveness of your trailer’s electrical system.
Battery Switch Operation
Turning the battery switch on and off is a simple process, but it’s important to do it correctly. First, locate your battery switch—it’s usually near the battery or in a convenient access panel. To turn the switch ON, rotate it to the position that indicates “ON” or “BATTERY.” A click or definite change in resistance will usually confirm the switch is engaged.
To turn it OFF, simply rotate it to the “OFF” position. Always ensure the switch is securely in either the ON or OFF position to avoid partial contact and potential arcing. Never force the switch; if it feels stiff, investigate potential binding or corrosion before proceeding.
Battery Switch Maintenance Best Practices
Regular inspection and cleaning are key to preventing problems with your battery switch. A build-up of corrosion on the terminals can hinder electrical conductivity, leading to poor performance and potentially damaging your batteries. At a minimum, inspect your switch every three months, or more frequently if you’re using your trailer in harsh conditions (e.g., salty coastal areas, dusty environments).
So, you’re planning a trip? Awesome! Before you pack your bags, make sure you’re covered. Check out Aon travel insurance for comprehensive options. They offer various plans, so you can find the right fit for your adventure. Then, compare that to Aon travel insurance to see which provider best suits your needs and budget.
Don’t leave home without it; peace of mind is priceless!
Cleaning and Inspecting Battery Switch Connections
Cleaning the battery switch and its connections is a simple preventative measure. Begin by disconnecting the negative battery cable to prevent accidental shorts. Use a wire brush or sandpaper to carefully remove any corrosion from the terminals and the switch itself. Pay close attention to the contact points where the cables connect to the switch. After cleaning, apply a thin layer of dielectric grease to the terminals to prevent future corrosion.
This grease helps repel moisture and dirt. Reconnect the negative cable securely once you’re finished.
Preventative Maintenance Tasks
Regular preventative maintenance will keep your battery switch functioning reliably for years. Here’s a checklist of tasks to perform periodically:
- Inspect the switch for any signs of damage, such as cracks, loose parts, or overheating.
- Clean the terminals and connections with a wire brush and dielectric grease at least twice a year, or more often in harsh environments.
- Check the tightness of all cable connections. Loose connections can lead to overheating and potential fire hazards.
- Visually inspect the wiring leading to and from the switch for any signs of damage, such as fraying or exposed wires. Replace damaged wiring immediately.
- Test the switch regularly to ensure it’s functioning correctly. A simple voltage check at the battery with the switch in the ON and OFF positions will confirm proper operation.
Following these simple maintenance steps will help ensure your travel trailer’s battery switch operates reliably, providing you with years of trouble-free service.
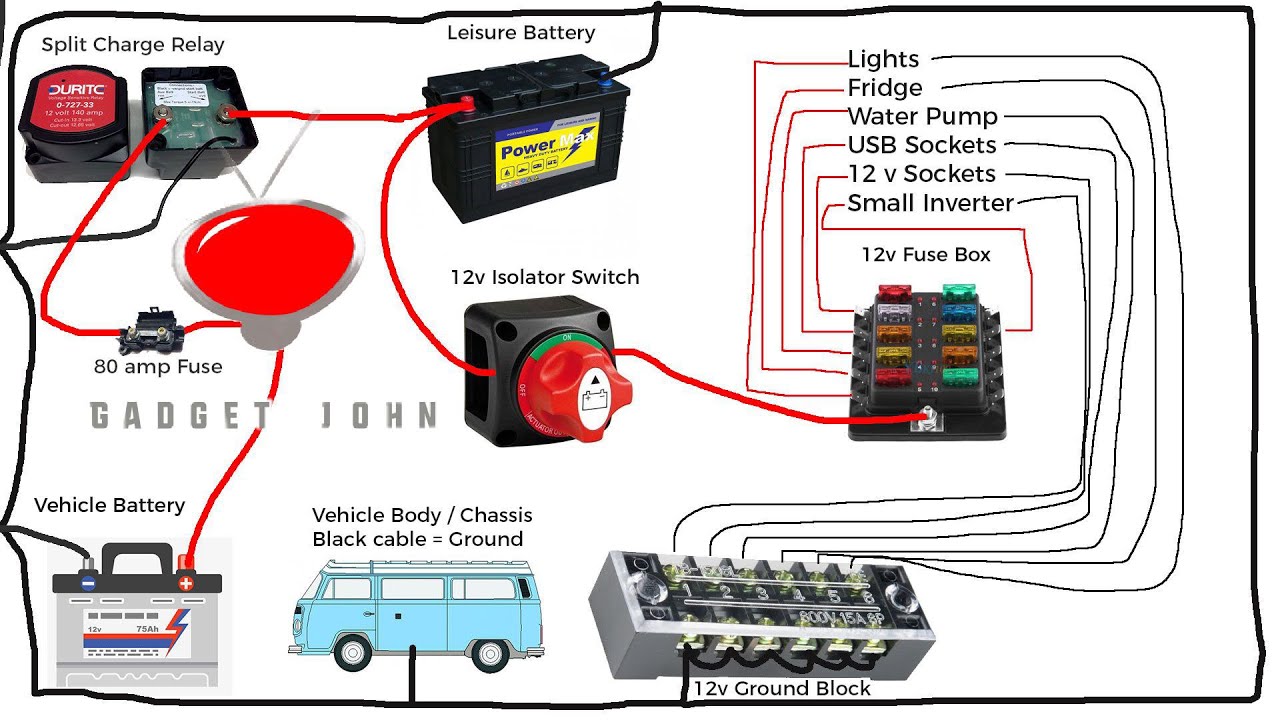
Battery Switch Installation and Wiring
Installing a new battery switch in your travel trailer is a straightforward process if you’re comfortable working with 12-volt DC wiring. This section Artikels the steps, safety precautions, and necessary materials to ensure a safe and effective installation. Remember, if you’re not comfortable working with electricity, it’s best to consult a qualified RV technician.
Steps Involved in Installing a New Battery Switch
Replacing or installing a battery switch involves disconnecting the old one, running new wiring if necessary, and connecting the new switch. Properly grounding the switch is crucial for safety and functionality. The specific steps might vary slightly depending on your trailer’s wiring and the type of switch you’re installing, but the general principles remain the same. First, disconnect the negative battery cable to prevent accidental shorts.
Then, carefully remove the old switch, noting how the wires are connected. Next, mount the new switch securely, ensuring a good connection to the trailer’s chassis for grounding. Finally, connect the wires according to the wiring diagram (shown below), double-checking all connections before reconnecting the battery.
Typical Travel Trailer Battery Switch Wiring Diagram
A typical travel trailer battery switch installation involves connecting the positive (+) battery cable to the switch’s input terminal, then routing the output from the switch to the trailer’s main distribution panel. A separate ground wire should connect the switch’s ground terminal directly to the trailer’s chassis. The negative (-) battery cable should connect directly to the battery, bypassing the switch for safety.
A simple diagram would show: Battery (+) –> Switch Input (+) –> Switch Output (+) –> Distribution Panel; Battery (-) –> Battery; Switch Ground (-) –> Trailer Chassis. Remember, this is a simplified diagram, and your specific wiring may differ slightly.
Safety Precautions When Working with the Electrical System
Working with electricity always presents risks. When installing a battery switch, take these precautions:* Always disconnect the negative battery cable before starting any work.
- Use insulated tools to avoid accidental shocks.
- Wear safety glasses to protect your eyes from sparks or debris.
- Ensure adequate ventilation to avoid the buildup of potentially explosive gases from the battery.
- If you’re unsure about any step, consult a qualified electrician or RV technician.
Tools and Materials Required for Battery Switch Installation
Before you begin, gather the necessary tools and materials. Having everything ready will make the process smoother and more efficient.
- New battery switch (appropriate for your battery size and amperage)
- Wire strippers/cutters
- Crimping tool
- Wire connectors (ring terminals, butt connectors)
- Appropriate gauge wire (if needed)
- Screwdriver (appropriate size for switch mounting)
- Wrench (to disconnect battery terminals)
- Voltmeter (optional, for testing connections)
- Drill and bits (if necessary for mounting)
- Safety glasses
- Work gloves
Impact of Battery Switch Failure
A malfunctioning battery switch in your travel trailer can lead to a cascade of problems, ranging from minor inconveniences to significant safety hazards and costly repairs. Understanding the potential consequences is crucial for proactive maintenance and safe RVing.A faulty battery switch can disrupt the flow of power to your trailer’s electrical systems, causing everything from dead lights and non-functional appliances to complete power outages.
This isn’t just inconvenient; it can also create dangerous situations, especially at night or in remote locations.
Battery Drain and Damage
A malfunctioning battery switch can unintentionally drain your batteries, even when the switch is in the “off” position. This happens because a faulty switch might allow a small, but continuous, current to flow, slowly depleting the battery’s charge. Over time, this parasitic drain can lead to completely discharged batteries, reducing their lifespan and potentially causing irreversible damage. In extreme cases, a deeply discharged battery can become sulfated, rendering it unusable and requiring replacement.
This is especially problematic for lead-acid batteries, which are commonly used in RVs. For example, imagine leaving your trailer for a month with a faulty switch; upon your return, you might find your batteries completely dead, necessitating a costly replacement.
Safety Hazards
A malfunctioning battery switch presents several safety hazards. A short circuit within the switch itself could generate excessive heat, potentially leading to a fire. Furthermore, if the switch fails in the “on” position, it could leave your batteries connected even when you intend them to be disconnected, increasing the risk of accidental short circuits or sparking when connecting other devices.
This poses a significant risk of fire or even explosion, especially in enclosed spaces. The inability to reliably disconnect the batteries could also make repairs and maintenance more dangerous.
Repair and Replacement Costs
The cost of repairing or replacing a faulty battery switch varies depending on the type of switch, the extent of the damage, and the labor costs involved. A simple switch replacement might cost between $20 and $50 for the part, plus additional labor costs for installation. However, if the malfunction has caused damage to other components in the electrical system, such as wiring or fuses, the repair costs can increase substantially.
In extreme cases where a fire has occurred, the costs could run into thousands of dollars due to fire damage and subsequent repairs to the trailer. The cost of replacing completely drained or damaged batteries must also be factored in.
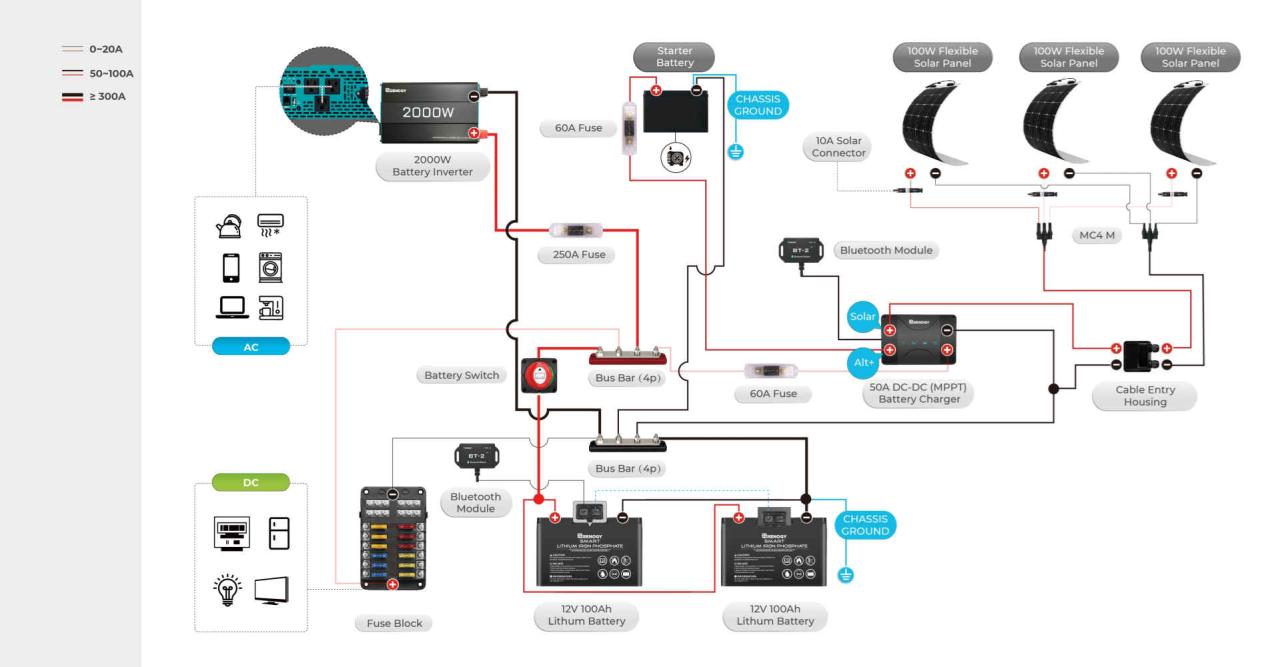
Different Battery Configurations and Switch Usage
Understanding how your battery switch functions depends heavily on your travel trailer’s battery setup. A single battery system is straightforward, while dual or even triple battery systems introduce more complexity and require careful consideration of your switch’s role. This section will clarify how the number of batteries impacts your switch’s use and wiring.The primary function of a battery switch in any configuration is to isolate or connect your house batteries to the trailer’s electrical system.
This allows you to disconnect the batteries to prevent parasitic drain when the trailer is stored, and selectively power different parts of the trailer’s electrical system. The way this isolation and connection works varies depending on the number of batteries and the type of switch used.
Single Battery Systems
A single battery system is the simplest setup. The battery is directly connected to the trailer’s electrical system, often through a fuse or circuit breaker. The battery switch acts as an on/off switch, completely disconnecting the battery from the trailer’s electrical system when in the “off” position. Wiring is straightforward, with the battery’s positive terminal connecting to the switch’s input, the switch’s output connecting to the trailer’s positive bus bar, and the negative terminal connecting directly to the trailer’s negative bus bar.
This setup minimizes complexity but limits power capacity.
Dual Battery Systems
Dual battery systems offer increased capacity and run time. A typical setup involves two batteries connected in parallel, effectively doubling the amp-hour capacity. The battery switch usually controls both batteries simultaneously, allowing you to disconnect both from the trailer’s system. The wiring involves connecting the positive terminals of both batteries to the input of the battery switch, and the output of the switch connecting to the positive bus bar.
The negative terminals of both batteries connect directly to the negative bus bar. This setup provides greater power, but requires more careful management of charging and balancing to ensure both batteries remain healthy.
Dual Battery System Wiring Example
Imagine two 12V deep-cycle batteries, labeled Battery 1 and Battery Each battery’s positive terminal connects to one side of a double-pole, double-throw (DPDT) battery switch. The other side of the switch connects to the positive bus bar powering the trailer’s appliances. The negative terminals of both batteries are connected directly to the negative bus bar. The switch has three positions: “Off,” “Battery 1,” and “Both.” “Off” disconnects both batteries.
“Battery 1” connects only Battery 1 to the trailer, while “Both” connects both Battery 1 and Battery 2. This setup allows for selective use of batteries for extending runtime.
Interaction with Other Electrical Components
The battery switch is a critical component in the overall electrical system. Solar panels usually charge the batteries independently of the switch. The solar charge controller manages the charging process and prevents overcharging. The converter, which converts 12V DC to 120V AC, draws power from the batteries, which are controlled by the battery switch. If the switch is off, the converter won’t function.
Properly managing the interaction of these components is crucial for efficient and safe operation. For instance, a faulty battery switch can prevent the solar panels from charging the batteries, even if the solar charge controller is functioning properly.
Mastering your travel trailer’s battery switch is more than just flipping a lever; it’s about ensuring reliable power for your adventures. By understanding the different types of switches, their functions, and potential problems, you can prevent costly repairs and enjoy worry-free camping. Regular maintenance, as Artikeld in this guide, will keep your system running smoothly, extending the life of your batteries and providing peace of mind on the road.
Remember to always prioritize safety when working with your RV’s electrical system.
Answers to Common Questions
What happens if my battery switch fails?
A failed switch can lead to complete power loss, battery drain, or even damage to your batteries. It could also create a safety hazard.
How often should I inspect my battery switch?
Inspect your switch at least once a season, or more frequently if you notice any unusual behavior or corrosion.
Can I use a multimeter to test my battery switch?
Yes, a multimeter can help you check for continuity and voltage to determine if the switch is functioning correctly.
What type of switch is best for my travel trailer?
The best type depends on your specific needs and battery setup. A double-pole double-throw switch offers the most control and protection.
